LinkedIn Profile Photo Best Practices for 2026
Master Your LinkedIn Profile Photo: Essential Guidelines for Professional Success
Your LinkedIn profile photo is one of the most critical elements of your professional online presence. According to LinkedIn, profiles with photos receive 21 times more profile views and 9 times more connection requests than those without. But not all profile photos are created equal. In 2026, standing out on LinkedIn requires more than just uploading any picture-it demands strategic thinking and attention to detail.
Whether you're job hunting, networking, or building your personal brand, your profile photo makes an immediate impression. Let's explore the best practices that will help you create a profile photo that commands attention and builds trust.
Why This Matters: After building Frame Generator and helping thousands of professionals enhance their LinkedIn photos, I've seen firsthand how small improvements to profile pictures lead to measurable increases in profile views and connection requests. The principles below are based on LinkedIn's own research combined with real-world observations from our user community.
Technical Specifications
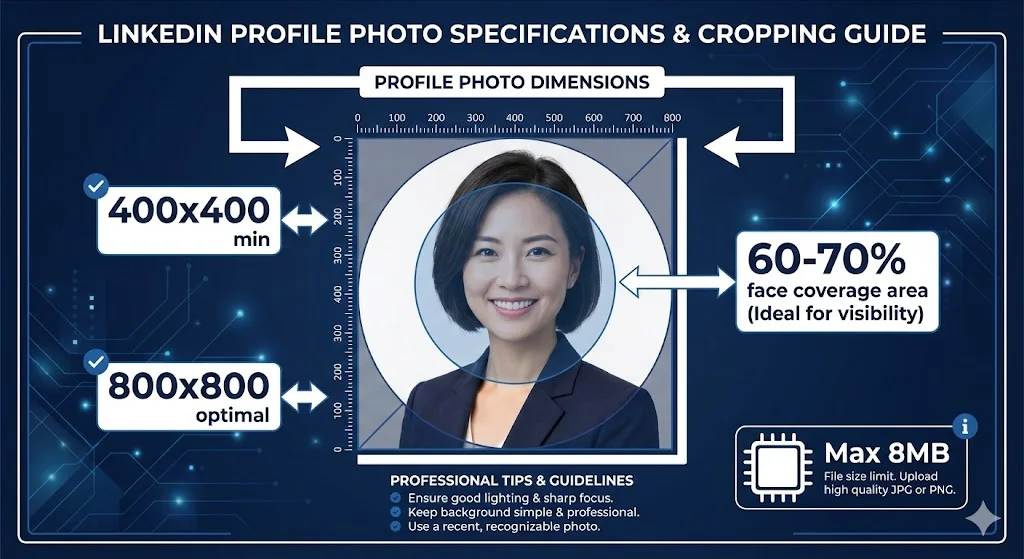
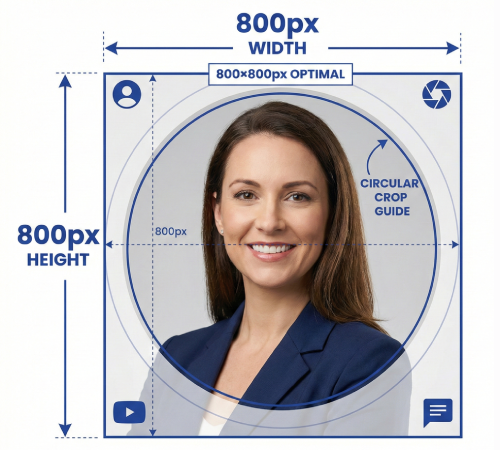
Optimal Dimensions:
- Recommended size: 400 x 400 pixels (minimum)
- Ideal size: 800 x 800 pixels for high-resolution displays
- Maximum file size: 8 MB
- Supported formats: JPG, PNG, or GIF
- Aspect ratio: 1:1 (square)
Pro Tip: Upload images larger than 400x400 pixels to ensure crisp quality on high-resolution screens, but keep the file size under 8MB to avoid upload issues.
Composition and Framing
The way you frame your photo dramatically impacts how professional and approachable you appear:
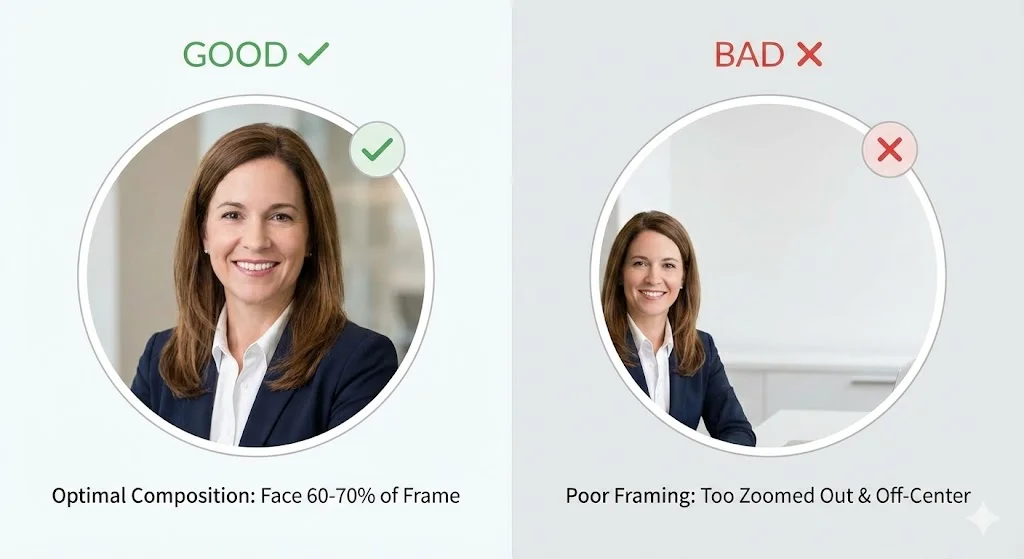
- Face Visibility: Your face should occupy 60-70% of the frame. LinkedIn's circular crop means the edges will be cut off, so center your face carefully.
- Eye Level: Position the camera at or slightly above eye level. Looking up at the camera can appear unprofessional, while looking down creates confidence and authority.
- Head and Shoulders: Include your head, neck, and upper shoulders. Too much body in the frame makes your face less visible in the circular thumbnail.
- Centered Positioning: Keep your face centered in the frame, accounting for LinkedIn's circular crop that will cut off the corners.
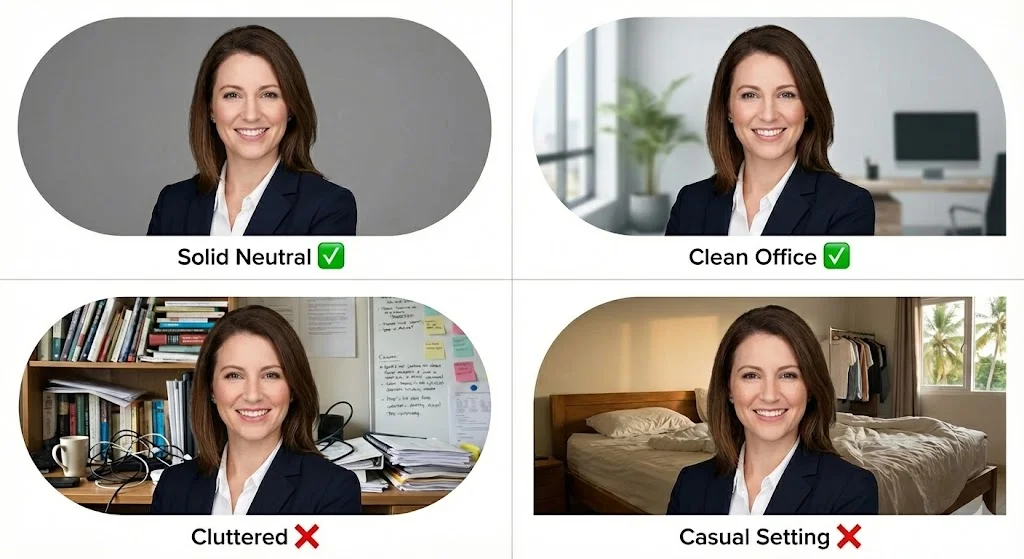
Background Choices
Your background should complement, not compete with, your face:
- Solid neutral colors: white, gray, navy, or soft blue
- Subtle office or workspace background (slightly blurred)
- Outdoor settings with natural light and simple backgrounds
- Professional studio backdrop
- Busy patterns or cluttered backgrounds
- Other people in the frame
- Personal items like beds or bathroom mirrors
- Distracting logos or text behind you
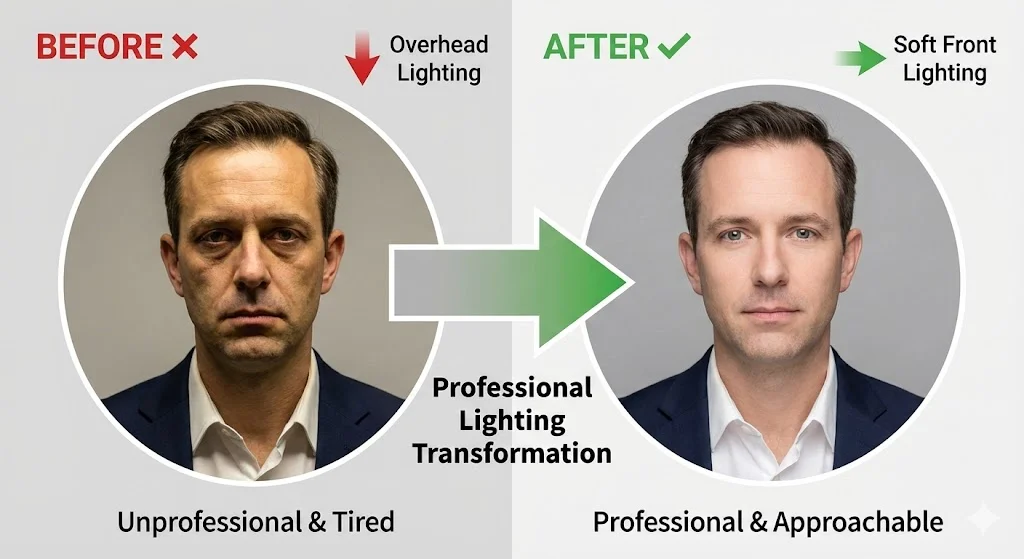
Lighting and Quality
Professional lighting can transform an average photo into an exceptional one:
- Natural Light: Position yourself facing a window for soft, flattering light. Avoid direct sunlight which creates harsh shadows.
- Even Illumination: Your face should be evenly lit without dark shadows. Use a ring light or softbox for consistent professional lighting.
- Avoid Overhead Lighting: Ceiling lights create unflattering shadows under your eyes and nose. Front lighting is always better.
- High Resolution: Use a good camera or modern smartphone. Blurry, pixelated photos look unprofessional and damage credibility.
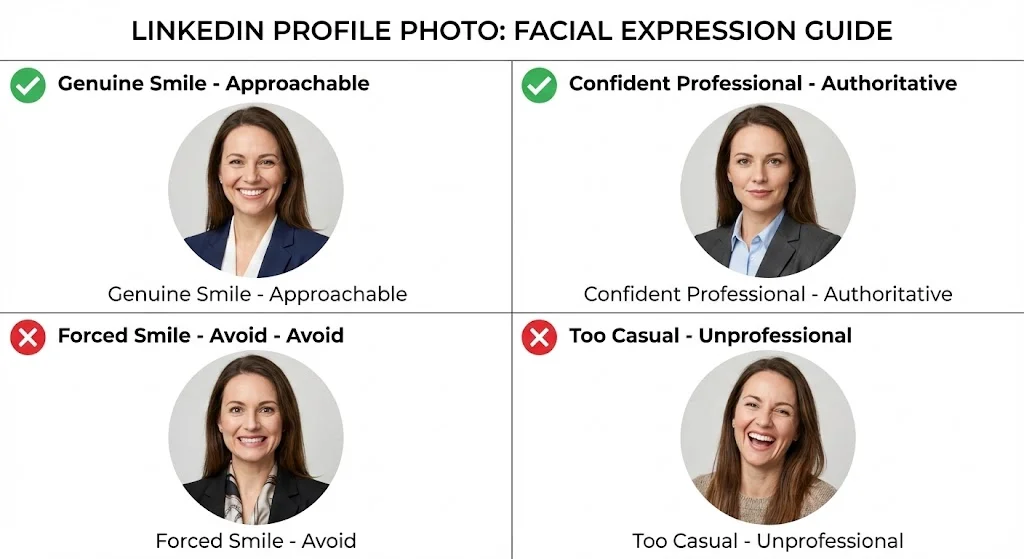
Expression and Body Language
Your facial expression and posture communicate volumes about your personality:
- Genuine Smile: A natural smile with teeth showing appears friendly and approachable. Think of something that makes you genuinely happy.
- Eye Contact: Look directly at the camera lens, creating virtual eye contact with viewers. This builds trust and connection.
- Relaxed Posture: Keep your shoulders relaxed and slightly angled rather than facing straight on. A slight turn looks more natural.
- Confident But Approachable: Balance confidence with warmth. You want to appear competent but not intimidating.
Attire and Grooming
Dress for the job you want, not necessarily the job you have:
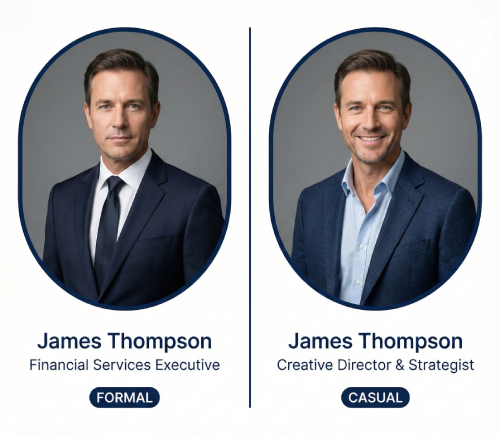
Industry Appropriate: Formal business attire for corporate roles (suit and tie, blazer), business casual for tech and creative industries, and neat casual for creative fields. When in doubt, err on the side of slightly more formal.
Solid Colors Work Best: Solid, professional colors photograph better than busy patterns. Navy, black, gray, and white are safe choices. Add a pop of color with a tie, scarf, or accessory if desired.
Well Groomed: Ensure hair is neat, facial hair is trimmed, and makeup (if worn) is professional and not distracting. Small details matter in professional photography.
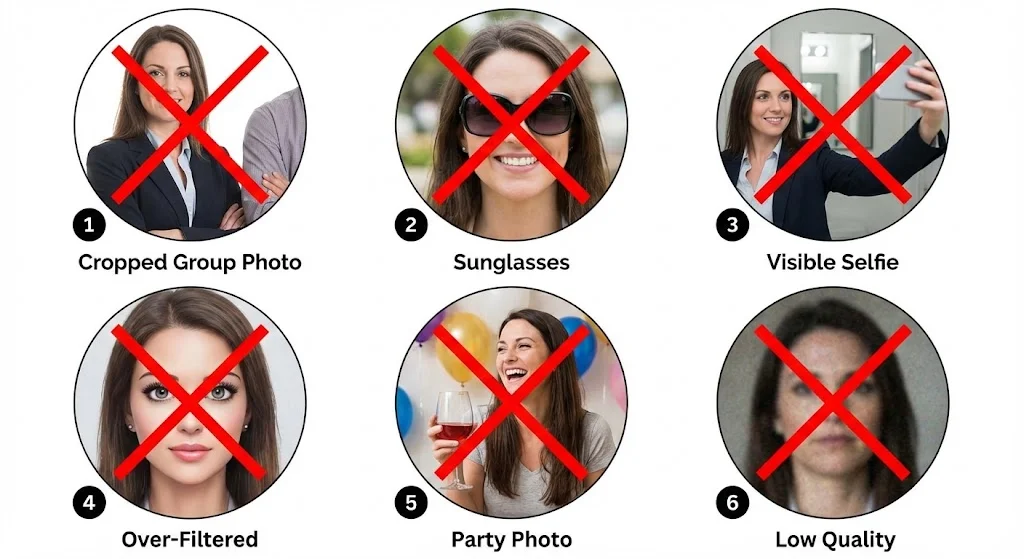
Common Mistakes to Avoid
- Using cropped group photos where other people are partially visible
- Photos with sunglasses or hats that obscure your face
- Selfies with visible phone or awkward arm angles
- Overly filtered or edited photos that don't look like you
- Photos from social events or vacations (even if you look great)
- Photos more than 2-3 years old that no longer resemble you
- Low-quality or blurry images
- Photos with poor lighting or harsh shadows
When to Update Your Photo
Keep your profile photo current to maintain authenticity and professionalism:
- Significant change in appearance (haircut, facial hair, glasses)
- Every 1-2 years as a general rule
- When changing industries or career direction
- If your current photo is poor quality compared to modern standards
- After a major professional milestone or achievement
Ready to enhance your LinkedIn profile photo? Use Frame-Generator.com to add professional frames that showcase your role, support causes you care about, or simply make your photo stand out. All while following these best practices!
The DIY vs. Professional Photo Debate
One question I get frequently is whether you need to hire a professional photographer. The answer depends on your situation:
- Modern smartphones (iPhone 12+ or equivalent) produce excellent quality
- Natural window light can match studio lighting when used correctly
- A friend or colleague can take a better photo than a tripod selfie
- Portrait mode on phones creates professional-looking background blur
- Executive-level positions where image carries significant weight
- Client-facing roles where first impressions drive business
- Career pivots where you need to signal a new direction
- When you've tried DIY multiple times without satisfactory results
Final Thoughts
Your LinkedIn profile photo is an investment in your professional brand. Take the time to get it right, and you'll reap the benefits through increased visibility, more connection requests, and enhanced credibility. Remember, people decide within milliseconds whether to engage with your profile - make those milliseconds count with a photo that represents your best professional self.
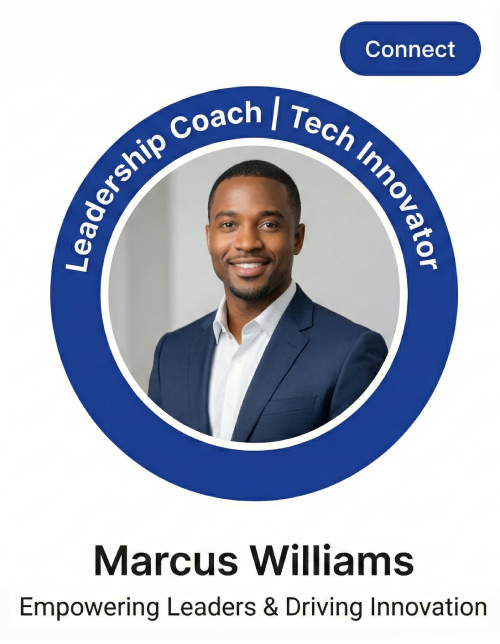
Once you have a great base photo, consider adding a custom frame to further differentiate your profile. A well-designed frame can communicate your role, highlight achievements, or simply add visual interest that helps you stand out in crowded LinkedIn feeds.
Latest Articles

Frame Your Face with a Custom Banner 🖼️

Spice Up Your LinkedIn Profile with Emojis 💥

Stand Out with 𝑪𝒖𝒔𝒕𝒐𝒎 𝑭𝒐𝒏𝒕𝒔 on LinkedIn 🖋️
Personal Branding on LinkedIn: A Complete Guide

How to Choose the Right Colors for Your Profile Frame
Profile Picture Dimensions Guide for All Social Platforms
Professional vs. Casual Profile Pictures: Which is Right for You?
The Psychology of Profile Pictures in Professional Networking
How to Update Your LinkedIn Profile Picture Without Notifying Everyone
Step-by-Step Tutorial: Creating Your First Custom LinkedIn Frame
15 Common LinkedIn Profile Mistakes (And How to Fix Them)